Home made solar boombox
A while ago I got a pair of computer speakers for free from Newegg, when I bought a wireless keyboard and mouse for 21 USD. Now, I already had 3 pairs of computer speakers, and since we only have two computers, two pairs were just sitting there taking space and having no use.
I had some solar panels just lying around, as well as some rechargable batteries. So one day I came up with the idea of modding those speakers and transforming them into a digital boombox.
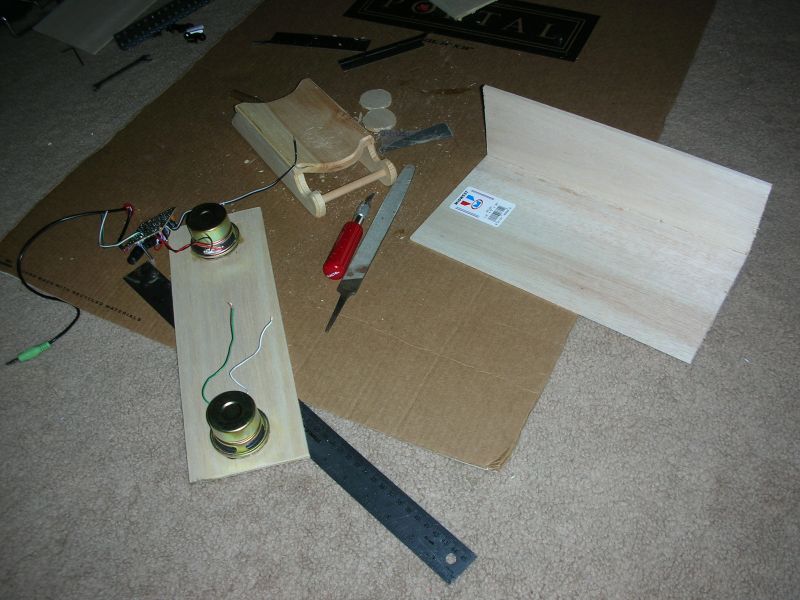
The first step was to take the speakers apart, and extract the amplifier and the speakers themselves, while discarding their case and converting them from 110 AC to 7-9V DC.
This step was pretty hard, because being cheap and made in China, they didn't have screws. Instead, they were glued together. With some patience and a small round saw blade I was able to take them apart. I needed to cut the wires because they were sealed with some silicone which was impossible to remove.
To make it even harder, the transformer was in one speaker, and it send AC current to the other speaker, which rectified it via 4 diodes and a capacitor.
Since I didn't want to feed it AC, and I didn't want 1.4 volts being dropped because of the diodes, I removed them and the capacitor, and connected my power cable to where the capacitor was.
The next step was to build an enclosure to house the whole thing (amplifier, speakers, batteries, etc.) Initially I wanted to use some sort of cardboard/polystyrene sandwich material, but cutting it properly with the tools I had was impossible. The polystyrene in the middle was being teared, and gluing the boards together was not that easy either.
Eventually, I've decided to use some wood, as it is stronger and easier to glue, and it looks nicer too. The problem with normal wood (or compressed wood boards) is that it takes special tools to cut, tools I don't have in my apartment. And cutting round holes in the middle for the speakers is not the most simple thing either.
I went to a crafting store looking for some suitable wood and tools, and I was surprised to find sheets of balsa wood for a very decent price (about 2-3 bucks/sheet). I needed only 2 sheets, but got 3, just in case.
For those of you who don't know what balsa wood is, here is a simple explanation:
The balsa wood is the nature's alternative to expanded polystyrene.
It's a very lightweight wood, and pretty strong for it's low density. It's main use is RC planes and gliders, but as you can see it can be used for other projects as well. Having such a low density, it can be cut with an Exacto knife, and cutting portions in the middle is easy as well. Just draw a line, and stab that line with the knife. Eventually you will be able to take that piece away, and then just file and sand the edges so they will become smooth and eliminate the excess material.
Making the enclosure was a relatively easy task, it took only about a few hours. The balsa wood is easy to cut and glue, and the only thing required is patience and attention.
After the front panel was done, I glued the speakers to it. Normally I was supposed to use some screws, but I was afraid the wood might crack, so the glue seemed to be a better alternative. They are small speakers, so I don't have to worry too much about vibrations.
One other aspect when designing the enclosure is to keep in mind that it's main purpose is to prevent the sound waves from the back of the speakers from going back in the room. The sound in the back of the speakers can cancel the sound from the front, so, ideally, the enclosure should absorb all the sound. This is pretty much impossible, but nevertheless, an enclosure that absorbs most of the sound is desirable. Because of this, it should be hermetically closed, so that the air can not escape. Given that objective, I wanted to seal it all with silicone, but that had a small disadvantage: sealing it makes it impossible to replace the batteries after a few years, when they can't charge as well as when they are new.
My first idea was to make a hole in the bottom, and have the batteries externally. This had some disadvantages though, such as making it look more ugly than it already was, and the possibility of the batteries falling out and ripping the wires, which would have required opening the box again.
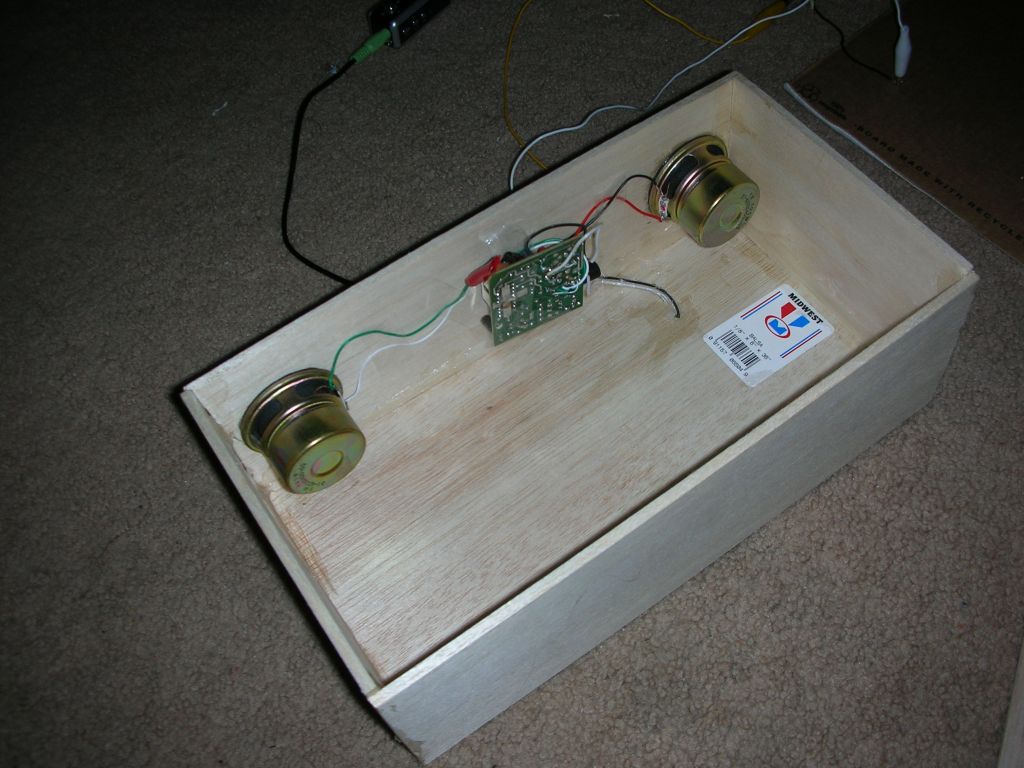
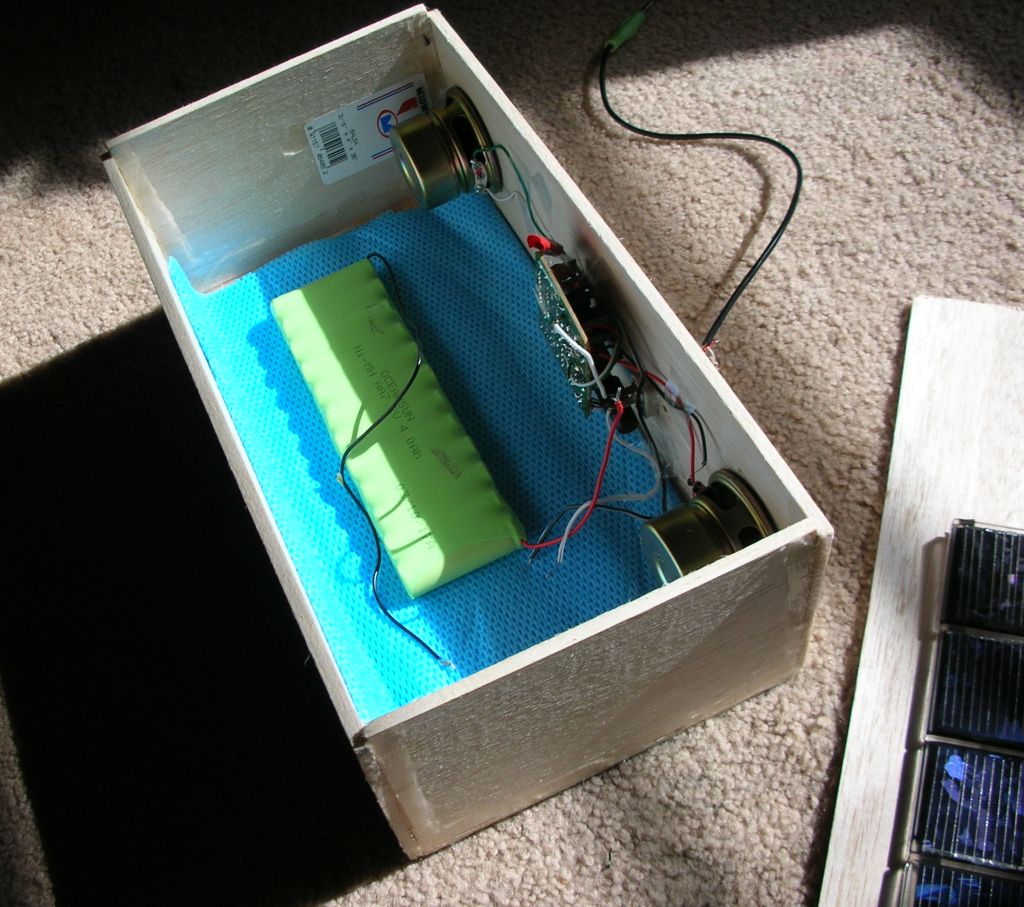
After some tests with the lid panel closed, but not sealed, I determined that it sounds reasonably well even if not totally sealed, so I just placed the batteries inside. Everything but the lid panel was sealed with the silicone, inside and outside.

Now that the amplifier/speaker system was in place, I had to put a sound source. The best idea seemed to be buying a defective mp3 player off eBay, and fixing it for my purpose. After some search, I found a Samsung YP-T8Z 1GB that wouldn't work unless having the external power connected, for about 40 USD.
When I got it, I noticed that it did work while the power was disconnected, but the sound was just mono, and it had something rattling inside. Opening it was easy. It had no screws or glue, and it could be open with a small flat screwdriver or just with your nails. First I had to detach the lateral panels, and then the middle panels.
The problem was that the stereo headphone jack was broken :/ I had no other alternative but to remove the whole jack, and soldering 3 wires. That was pretty hard, because I needed an SMD soldering tool, and I didn't have one so I had to improvise. Placing a piece of copper wire on top of my soldering gun did the trick.
One additional problem with that mp3 player is that it can not be charged with solar panels. For some reason, it always reported that the battery was full, so it didn't want to charge it. This is strange because the solar panels had a 5.5V output, which was lowered by a diode, so in theory it should have worked, but it didn't. Most likely a software problem which requires a very specific voltage and current.
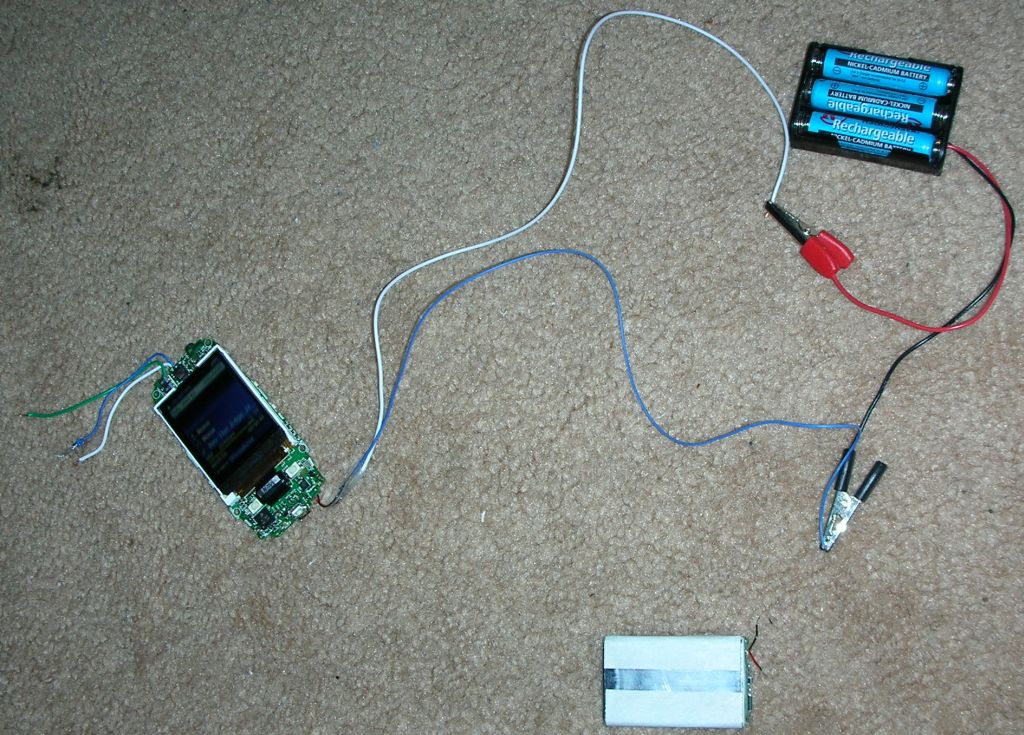
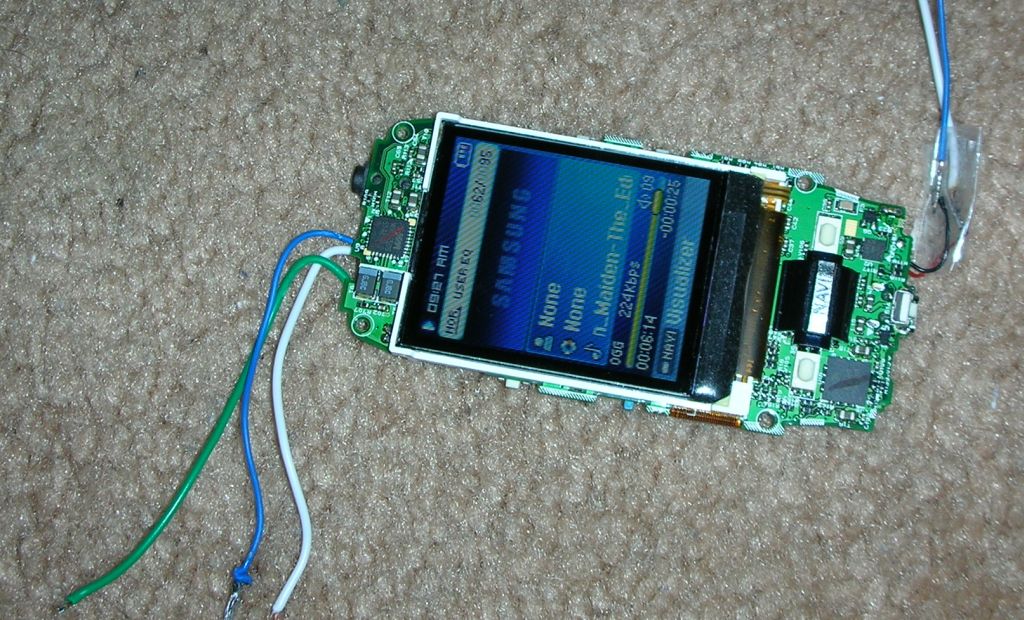
So what I did was open it again, remove the Li-Ion battery and replace it with 3 NiMh batteries, which I am charging independently (directly from the solar panels, not through the mp3 player). The pictures above show the mp3 player being tested from some AAA batteries. It worked just fine.
This system has a few advantages:
1. About 50 hours of playtime, rather than 20 (the current draw is 50 mAh, the batteries are 2500 mAh)
2. Easier to replace.
3. Easier to charge.
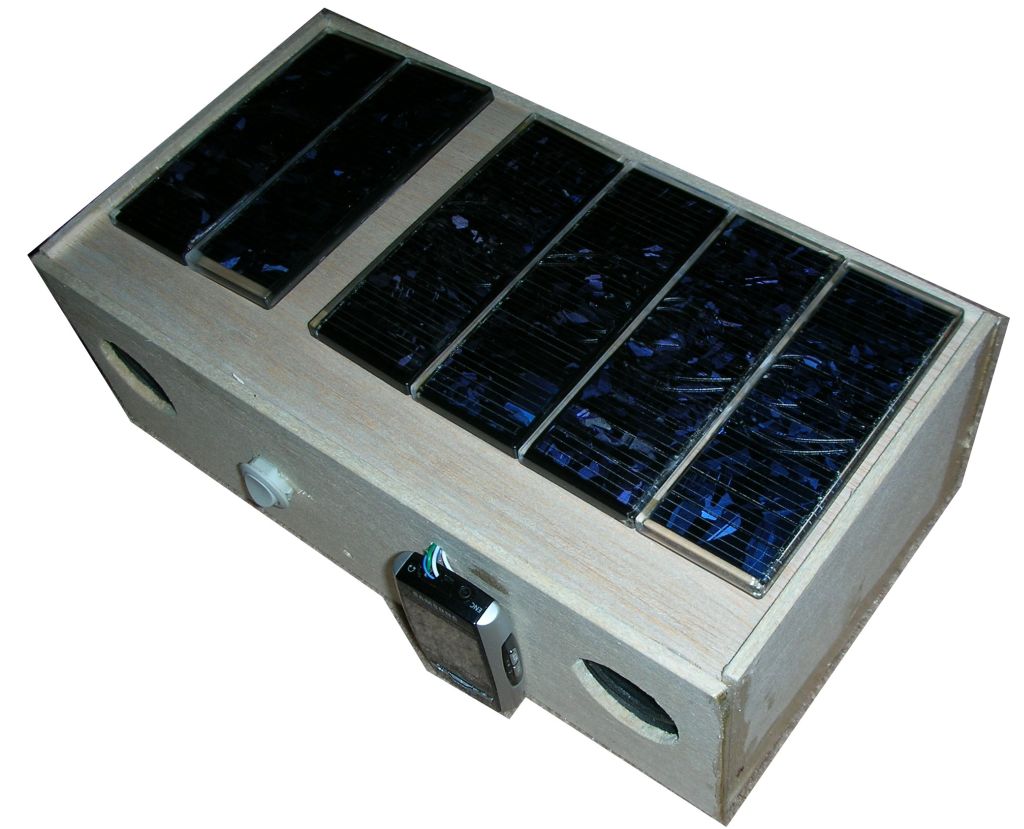
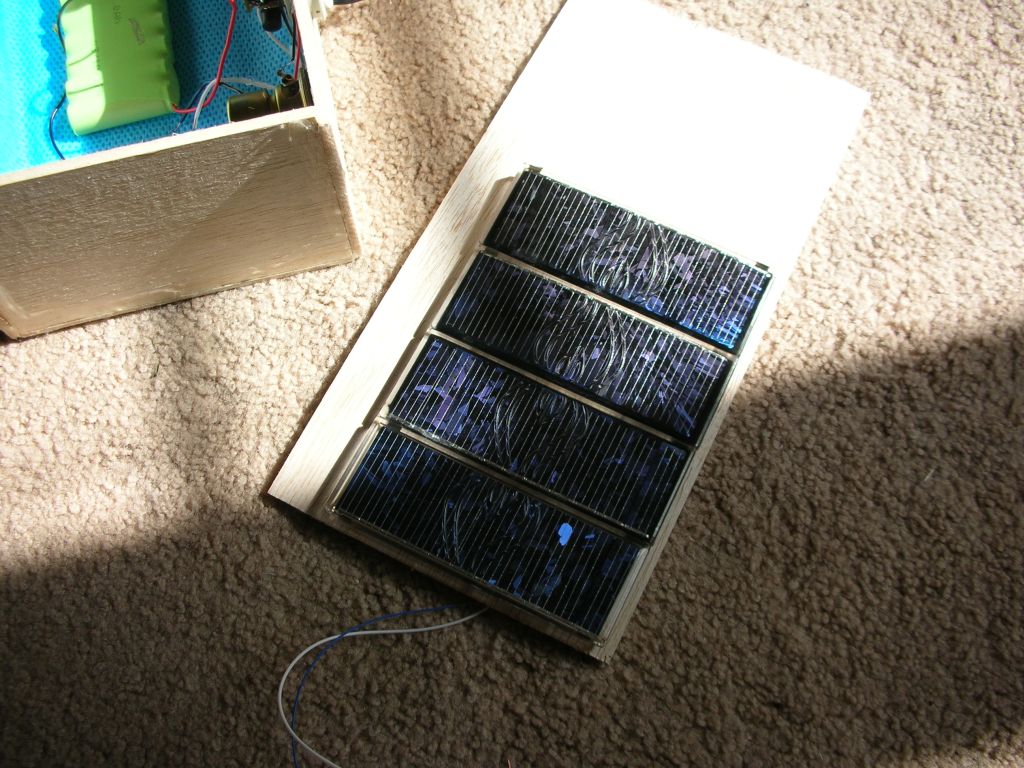
As you can see, I am using 6 solar panels. Each is 6V, 90 mA. The amplifier battery is 7.2V 4A, and the mp3 player uses 3 NiMh batteries. So the big battery pack is charged from 4 solar panels (2 in series, to in parallel), while the small battery pack is charged by 2 solar panels in parallel. The diodes are on the back of the solar panels, and their back is glued on the lid.
The final step was connecting all the wires inside, gluing the batteries and performing some final tests.
Project overview
This project took about 20 hours and cost about 90 USD.
It looks ugly, but there can be some improvements, such as a plastic faceplate, or the wood being painted.
It is actually cheaper, if you just buy a commercial stereo system and attach an mp3 player to it, although it won't charge from the sun. However, doing it yourself is more fun, and you can learn some stuff from it, such as how to build a good speaker enclosure, how to work with balsa wood, etc.
Here are some more pictures of the project.
Amp. battery glued, but not connected yet.
The lid, with just the panels for the amp.
Preliminary version, testing with a different mp3 player.

All the wires connected, ready to go. Notice the two battery packs, one for the amp, one for the mp3 player.

Same, just a different angle.

posted by Radu at 8:45 PM
![]()

10 Comments:
Hi, I like this project a lot, but as a DIY-audio fan (i'm preparing to make some proper and not-expensive DIY speakers for my stereo) I have some concerns about it. :) I hope you don't mind.
The enclosure is rather lightweight, so maybe some vertical pieces of wood inside would make it more solid, and absorb some sound waves as well. You seem to have paid a lot of attention to prevent the sound from coming back to the room, so maybe filling the enclosure with some material like wool, cotton wool or foam would absorb the sound inside. Such muting might result in a little less basses but the sound characteristics migt be cleaner (it also "virtually enlarges" the speakers enclosure by around 20%, and yours is quite big). The last thing is that you put both speakers into the same box; maybe they should be somehow separated, I don't have experience in this, but as it is a stereo, I would suspect some interference when there is different signal in both channels.
You used some computer speakers, so both the amplifier and speakers might not be of a very high quality, and have different statistics as Hi-Fi loudspeakers. Anyway it is an interesing idea and a nice project with your solar panels.
PS. sorry for my english ;)
You are right, this is not the most HiFi sound system ever built by mankind :)
And I was thinking of putting some cotton, or expanded polystyrene inside, but as long as you don't turn it up very loud, the sound quality is OK (I am not an audiophile).
As for separating the left and right speakers, well, you can't really get a true stereo effect anyway with such a small device. The speakers are too close together for that.
Hey I just wanted to say I enjoyed reading the post, I read it yesterday but didn't have time to post any comments. I was hoping for some pictures, nice that you have some up now. Never knew you could find a good purpose for old MP3 players that don't work properly anymore. Wish I would have kept mine now. I think I dropped it a few too many times and it started to not play any more music. It would turn on but for some reason would never play any songs. So I just trashed it. Probably something happened to the memory card after so many drops would be my guess...I used it a lot in high school when running. Nice project looks very cool.
Never throw away a broken device. Instead try to sell it on eBay. You'd be surprised to see how many people will buy them :)
Ive actually been working on a homeade stereo like this for a couple weeks, but hit a point that i couldnt get any further without finding an amp. I was originally going to be a Class T amp, but now that i see this, ill see how it works with one taken out of some computer speakers that i already had used the stereo jack from. It'll take some rewiring, but hopefully it works. This is a great article, not many like it around. Good job :)!!
That is a really neat DIY project there man=) I have been think about something similar for a cheap mp3 player I have that has 1 gig inside and a SD slot. I would like to take it a bit further and figure out a way to put a playlist screen like winamp or something similar on it though. I'd like any suggestions you might have on that. I think it will have to be a mini computer or use an old palm pilot I have(I want a touchscreen). The only thing i cant figure out is how I control the mp3 player from the palm pilot=( Well thanks for the guide man.
I'm building a similar device and wandered about balsa as I used to build a lot of model aeroplanes and had made a small speaker from my walkman about 10 years ago. Its good to see that balsa works! For anyone looking for an amp have a look around for a kit or ready built module using chips like the TDA28222 or LM386. These only output around 1 watt per channel but this really is all you need for little speakers.
Wow this is so cool! Thanks for showing us the pictures on how to DIY a solar boom box. Thanks.
Carpet Repair
What a very clever idea! A Speaker boom box, solar power, this is very impressive.
Wow this project would never come to my mind. I enjoyed reading the entire description. It looks a bit crude, but i think it's great when you're outside and don't need an external power source for your boom box.
Post a Comment
<< Home